With the holiday season fast approaching, there’s no better way to celebrate than by indulging in mouthwatering festive treats. One such delight that should always be on the menu is a delicious gluten-free Christmas cake. And guess what? Gluten-free expert Becky Excell has created a recipe that proves you don’t have to miss out this Christmas when following a gluten-free diet.
Christmas is a time for coming together with loved ones and savouring special dishes. However, for those of us managing gluten sensitivities or coeliac disease, finding suitable holiday desserts can be a challenge. But fear not, we’ve got you covered with Becky’s show-stopping Christmas cake.
In this guide, we’ll walk you through the step-by-step process of creating this holiday masterpiece. Becky’s tips and tricks are the icing on the cake (pun intended) that will make your baking experience a breeze and your cake a showstopper.
Starting Your Gluten-Free Christmas Cake
The foundation of a perfect gluten-free Christmas cake is the dried fruit mix. Becky’s mix includes currants, sultanas, raisins, glacé cherries, candied mixed peel, lemon zest and a generous splash of brandy or Amaretto. To kick things off, start by combining these flavorful ingredients in a large bowl. Becky recommends letting the mix soak for at least 12 hours. This step allows the fruits to absorb the rich, aromatic flavours of the brandy or Amaretto, infusing your cake with a wonderful depth of flavour.
Next, preheat your oven to 140°C (280°F) per Becky’s recipe and prepare the cake tin.
Becky’s pro tip: Line the cake tin with non-stick baking paper, ensuring it’s slightly taller than the tin itself. This step is crucial as the cake needs to bake for around 4 hours to develop the beautiful golden brown colour characteristic of a Christmas cake. The taller lining will protect the sides of the cake from burning during the extended baking.
The Baking Process
With the oven preheated and the fruit mix sufficiently soaked, it’s time to prepare the cake batter. The moist fruit mix is incorporated with gluten-free plain flour and other key ingredients (including dark brown sugar, eggs, molasses and ground and blanched almonds), creating a cake batter that is both flavourful and light.
Once your batter is ready, gently pour it into the prepared cake tin. Ensure the batter is level to guarantee consistent baking and a cake that looks as good as it tastes.
Becky’s tip is to cover the top of your cake with a square of baking paper with a hole in the middle. The hole helps with steam and the covering helps prevent the cake from burning.
Place the tin in the preheated oven and let it work its magic. Becky’s recommended baking time and temperature are essential for achieving that golden brown hue without overcooking.
After Baking: Infusing Flavour
After baking, as your cake cools, it’s time to enhance its flavour further. Becky’s technique involves poking the top of the cake with a skewer, allowing you to introduce additional Amaretto or brandy into the cake. This step not only amplifies the festive flavours but also keeps your cake wonderfully moist.
The cake’s infusing process doesn’t end there. Once you’ve poked the cake, carefully remove it from the tin and wrap it in two layers of baking paper, followed by two layers of kitchen foil. This method seals the cake’s moisture, ensuring it stays fresh longer.
Maintaining Freshness
One of the remarkable qualities of a well-made Christmas cake is its ability to age gracefully, becoming even more flavoursome with time. To achieve this, Becky recommends periodically feeding the cake with more Amaretto or brandy every few weeks.
Decorating Your Gluten-Free Christmas Cake
While the cake’s flavour is undoubtedly the star of the show, presenting it beautifully adds an extra layer of festive charm. Becky recommends decorating the cake about a week before serving, ensuring it looks as good as it tastes.
Begin by unwrapping the cake from its baking paper and foil wrapping, then turn it upside down so that its flat end is facing upwards. To create a smooth and visually appealing surface, spread a thin layer of slightly warmed apricot jam over the top.
Next, press rolled marzipan onto the cake’s surface and down the sides, ensuring it’s lovely and smooth. Trim any excess marzipan around the base using a sharp knife. This step results in a professional-looking finish that will impress your guests.
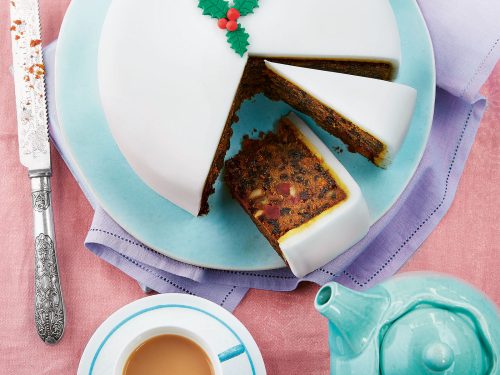
Now comes the fun part – decorating your Christmas cake to reflect the holiday spirit. You have the creative freedom to design your cake’s appearance however you prefer. In Becky’s cake, she uses red and green fondant to craft holly leaves and berries, applying a little water to stick them in place.
Decorating the cake with fondant lets you get as festive as you like. Create traditional holiday motifs, like snowflakes or poinsettias, or let your imagination run wild with your own unique designs. Whatever you choose, your gluten-free Christmas cake will be a beautiful centrepiece for your holiday celebration.
So, this holiday season, enjoy the company of loved ones and relish a delicious gluten-free Christmas cake that caters to dietary needs without compromising on taste. Make Becky’s cake a part of your festive traditions, and you’ll have a dessert that not only delights your taste buds but also adds a touch of artistry to your holiday table. Happy baking, and happy holidays!
If you’re looking for more recipes to delight friends and family this Christmas, you can use the recipe index on our site to find what you’re looking for. We’ve got sweet and savoury recipes to make this your best Christmas yet, including Roast Pork with Gluten-Free Stuffing, Christmas Pinwheels that will be enjoyed by young and old, and for adults only our Gin and Tonic Roulade.
Gluten-Free Christmas Cake
Ingredients
For the soaked fruit
- 350 g currants
- 150 g sultanas
- 125 g raisins
- 125 g glacé cherries
- 50 g candied mixed peel
- 50 g dried cranberries
- 120 ml Amaretto or brandy, plus extra for ‘feeding’
- Grated zest of 2 lemons and the juice of 1
For the cake
- 225 g (1 cups plus 2 tablespoons) dark brown sugar
- 225 g (1 cup butter) softened, plus extra for greasing
- 4 large eggs
- 1 tablespoon molasses
- 1½ teaspoons ground mixed spice
- 225 g (1¾ cups) gluten-free plain flour
- ½ teaspoon xanthan gum
- 25 g (¼ cup) ground almonds
- 50 g blanched almonds chopped
To finish
- 5 tablespoons apricot jam
- 400 g marzipan
- 700 g white fondant icing
- Gluten-free icing sugar for dusting
- Red and green fondant icing for a holly decoration
Instructions
- Place your dried fruit in a large bowl and ensure that any larger chunks of dried fruit are finely chopped – dried cherries especially, if using. Pour over your Amaretto or brandy and the lemon juice, then stir in your lemon zest. Cover and allow to soak for at least 12 hours.
- Preheat your oven to 140°C (280°F). Grease a 20cm loose-bottomed, deep, round cake tin and line the base with non-stick baking paper. Then line the sides, ensuring the paper is slightly taller than the tin itself. Finally, wrap a double layer of baking paper around the outside of the tin and secure round the middle with string, with the paper about 5cm taller than the top of the tin. (This prevents the sides of the cake from burning during the long bake.)
- Add all the cake ingredients to a large mixing bowl. Mix until fully combined, ideally with an electric hand whisk. Gradually stir in all your soaked, dried fruit thoroughly, using a spatula or wooden spoon. Spoon into your prepared tin, making sure it’s all nice and level.
- Cover the top of your cake with a square of baking paper with a hole in the middle of it – the hole helps with steam and the covering helps prevent the cake from burning. Bake in the oven for around 4 hours – it will be a dark golden colour and fairly firm. Allow the cake to fully cool in the tin.
- Once cooled, poke all over with a skewer (until about halfway down) and spoon over a little extra Amaretto or brandy. Remove the cake from the tin and wrap in two layers of baking paper followed by two layers of kitchen foil. Store in an airtight container for up to 3 months, feeding the cake every few weeks by pouring over a tablespoon of Amaretto or brandy.
- A week before serving, remove the cake from its baking paper/foil wrapping and turn it upside down so that its flat end is facing upwards. Spread all over with a thin layer of slightly warmed apricot jam.
- Generously dust your work surface with icing sugar and briefly knead your marzipan until softer and more workable. Dust your surface once again and your rolling pin too. Roll out your marzipan to a large circle, around 4mm thick, ensuring it’s big enough to cover the entire cake. Use your rolling pin to lift up the marzipan and cover your cake with it.
- Carefully press it onto the top and down the sides so that it’s lovely and smooth. Trim any excess marzipan around the base, using a sharp knife.
- Dust your surface once more with icing sugar, then roll out your white fondant icing to a large circle, around 4mm thick. Again, use your rolling pin to lift up the icing and cover the cake with it. Trim off any excess.
- Decorate the cake however you wish with edible or non-edible decorations, such as ribbons or festive figures. I used a little red and green fondant to make holly leaves and berries, using a little water to stick them in place.
Notes